
Country style Cowboy Cake made with whiskey and dark molasses — with a decadent sweet whiskey glaze and a whiskey icing slathered between each slice…and vanilla and sweetened whipped cream substitutions for the kids. Continue reading

Country style Cowboy Cake made with whiskey and dark molasses — with a decadent sweet whiskey glaze and a whiskey icing slathered between each slice…and vanilla and sweetened whipped cream substitutions for the kids. Continue reading
 New Year’s is a party time, for sure, but then it quickly becomes a time of reflection. Know what I mean? The challenges and adventures of the last year, the hope for a bright new year, resolutions for change in the upcoming year.
We’d like to add “giving” to that list.
As in: Who needs my help? Who needs a pat on the back? Who needs a statement of appreciation from me? Who needs some money from my pocket to help them along? Who needs a push in the right direction, or maybe even a kick in the pants? What skill do I have that I can pass on to help someone? Even the simple act of showing a child how to bake a cake or a loaf of bread can create a precious memory that will last a lifetime (unless they teach someone else, maybe even one of their future children, and so on).
This year, we’re using the ole’ martial arts credo…Be ready for anything!

Funny. My daughter doesn
I am so very grateful for the tremendous support of the Bake This Cake! blog this year. With so many new friends and followers this year, it has been an amazing (and fun) year.
And what adventures we’ve had….like…
The Culinary Historians of Southern California’s Yosemite Dinner — The annual potluck event where 80 culinary historians gathered in Pasadena to recreate an historic dinner between President Teddy Roosevelt and John Muir in Yosemite. May I add that I baked the Edith Roosevelt Cloves Cake? AND I discovered a major error in a 100-year-old recipe (but more on that in an upcoming blog). 🙂 You can see an album of photos from this event by clicking >here<.

Venison, oysters, carrot pudding and more with the Culinary Historians
The Annual Neighborhood Halloween House, sponsored by our neighborhood property owners’ association, at our house going on 20 years in a row now, with chili dinner and treats for the whole neighborhood and their guests…and a ghostly graveyard for the kids…

Halloween Pumpkin Cheesecake Cream Puffs
The Techmunch L.A. event, where food writers from all over the U.S. gathered to learn better techniques for food blogging.. You can see a photo album of this event by clicking >here<.
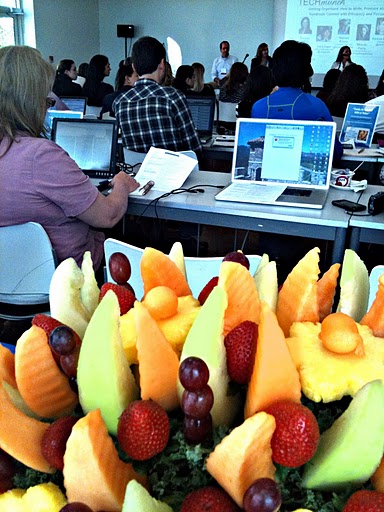
Food writers class in session in Santa Monica…
The Slow Food USA $5 Meal Challenge where we whooped-it-up for an entire meal for a family of 5 for $5 — whoo hoo!….

Slow Food USA Challenge $5 Whole Wheat Pasta Dish or a family of 5
The NutrItaly event in Westwood, where we learned new ways to create healthier Italian food. You can see a photo album of the NutraItaly event by clicking >here< and a video on the event >here<.

Chef prepares Enoteca
The Food Bloggers Los Angeles Holiday Cookie Swap, where I added my Little Prairie Cakes to the gorgeous table of holiday cookie delights. You can see a photo album of this fun event by clicking >here<. And you can get all the recipes for the cookies by visiting our friends >here<.

FBLA Holiday Cookie Swap and Cookbook Exchange
My 90-year-old mom’s book signing event for her photo-poetry book, “While Wandering”, where I launched my vintage Lady Baltimore Cake…

Instagram photo of Mom speaking at her book signing event
There were office parties…
…with homemade lasagna for a Thanksgiving potluck…

Lasagna for potluck office party
…a special strawberries and cream birthday cake for 50…

Strawberries & Cream Cake for 50 Office Party Gone Wild
…the Go Green Day to promote public transit…

Chocolate Snacking Cake — for 65 people!
…a deli table retirement party…

35 pounds of homemade Country Potato Salad
And there were some nice big sit-down dinners with friends and family….
…Thanksgiving buffet at the river house with our River House Whipped Cream Cake…

Thanksgiving buffet at the river house
…Christmas night dinner in the city…

Christmas Dinner at Beachwood
And the shared recipes on our blog during the year …
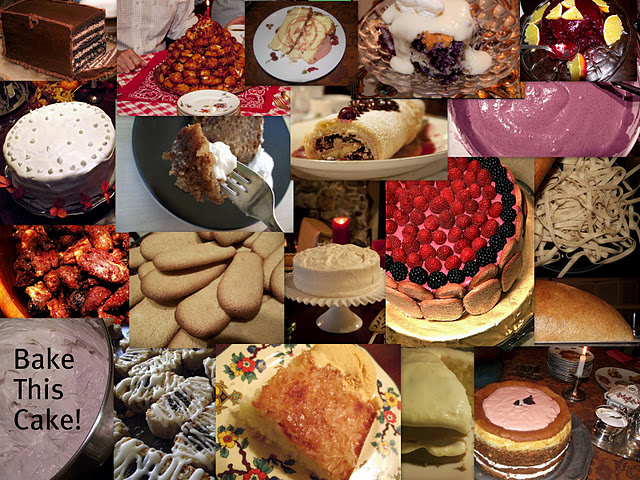
Some of our recipes presented in 2011
Now it’s time to say thank you to our readers! And, a BIG thanks our sponsor of this giveaway, King Arthur Flour (we’ve received a free boxful of lovely gift-giving products to give away to one lucky winner).
1.) King Arthur Flour Bake and Give Pan Ring – 1 Set of 12…

King Arthur Bake and Give Ring Pan – Set of 12
2.) King Arthur Flour Bake and Give Round Pans – 1 Set of 6…

King Arthur Flour Bake and Give Round Pans – Set of 6
3.) King Arthur Flour Bake and Give Wooden Bakers – 1 Set of 6…

King Arthur Flour Bake and Give Wooden Bakers – Set of 6
4.) King Arthur Flour Tulip Papers – Red – 1 Set of 24…

King Arthur Flour Tulip Papers – Red Set of 24
5.) King Arthur Unbleached Cake Flour…

Here are the contest rules….
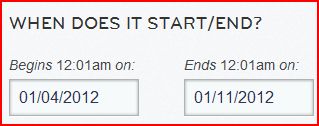
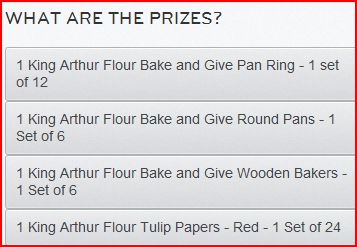
+ 1 King Arthur Flour Unbleached Cake Flour
Do one or more of the following once or once a day. Each task gives you an additional entry. With the exception of making a general comment, you must let me know in the comments section of this blogpost what action you took. For example, if you tweet about the giveaway,like, “Check-out the cool giveaway by @BakeThisCakeCom at http://www.bakethiscake.com” then come here and post a comment like: “I tweeted the giveaway!”.

************************************
UPDATE! WE HAVE A WINNER! Hip hip! (Don’t worry, we’ll have more!).
With her permission, a little about our winner:
Inger Frauenheim of Seattle…who is a busy at-home Mom of 2 young boys. She likes: baking, cooking for her family and friends, baking with her boys and eating homemade goodness. She cherishes the memories baking times create, knowing they will provide stories to tell for generations to come. She is always looking for new recipes, especially time tested ones, that will fill their days in the kitchen with time spent together baking and sharing in celebration.
Congats, Inger!
And thank you all for participating! More giveaways to come. 🙂
Good luck and Happy New Year!
Leslie


Presenting Boiled Icing – a classic cake frosting and throw-back to turn-of-the-century recipes …perfect for ringing in the new year vintage style! The filling for the Lady Baltimore Cake is decked with nuts and dried fruits all twirled together with the special Boiled Icing to re-create an unusual vintage surprise with each bite.

The party season has not quite concluded. Yo!  Resolutions are being mentally scripted by the boatloads. Mine? I have so many! I will try to think up better passwords. I will stop worrying about not exercising enough. I will grow a thicker head of hair. I will embrace auto-correct. I will learn to talk like the GPS lady. And on and on! We are reflecting on the people, events and ideas that have impressed us over the past year of change. Questions about what the new year will bring are sneaking into our thoughts. And hooking up with friends and family continues to play a a pivotal role in the season of holiday fellowship. Which brings me to — cake. You knew I was headed there, right? 🙂 Hip and cool vintage cake, that is. What better way to ring in the prospects of an amazing new year than with an historic cake from century-old recipes, tweaked to perfection for present-day tastes.
Here’s my favorite short version of the nutty Lady Baltimore Filling from a crusty little copy of Iglehart’s 1920’s booklet. A good starting point, for sure. 🙂

Party Size Cake, Party Size Filling With Extras: The filling recipe presented here is for our Lady Baltimore Cake — made in two very large 22″ by 2″ round pans (those are LARGE cake pans). We’re celebrating my 90-year-old mom’s book signing for her book, “While Wandering: A Photo-Poetic Journey Through California Landscapes“ — so we need a large celebration cake! (Divide the recipe by 4 if you will be making a standard family-sized cake.) We’ve made more fruit and nuts than you may actually want to use but this is where your own personal taste comes into play. Deck every cake layer and even the top of the cake with the filling ingredients before smothering it all with Boiled Icing — OR leave the very top of the cake pristine with just icing, OR use less nuts and fruits for a less crunchy filling. This is all according to your taste preference. So play with it — or go by the book, either way. If you have leftovers, they won’t be around for long. 🙂

Slow Cooking Warning: 1.) The lovely and colorful raisins take an hour to plump with a little hot vanilla soak and they take another hour to dry out again; 2.) The nuts must be roasted to enhance their highest flavor potential; 3.) The dried fruits are best hand-chopped to get them to a nice uniform dice; and 4.) The Boiled Icing needs to, well, boil for a while and, after the cake is frosted, it needs a little time to transform to a crusted snowy showpiece. So, yeah. Consider yourself warned. Set aside your briefcase, jack up the music and have some fun with this slow cooking vintage cake project. 🙂

Tools Needed for Filling:
Tea kettle or pot for boiling water (or large boil if using the microwave)
2 large bowls (for soaking raisins and mixing dried fruits with nuts)
Strainer or sieve (for draining raisins)
Paper towels (for drying raisins)
Cookie baking sheet (for roasting nuts)
Food processor (for nuts)
Nice sharp knife for hand-chopping the dried fruits
Ingredients for Filling:
4 cups of seedless organic raisins mixed with golden raisins
4 cups of boiling water (to dispose of after soaking raisins)
1 Tablespoon of pure vanilla extract, fine quality (you can substitute with sherry or brandy)
4 cups of whole almonds, chopped, then roasted (substitute: walnuts or pecans)
15 dried figs (we used 10 small dried Mission black figs, 5 large Calimyrna figs)
4 large dried dates (we used Medjool dates)
Directions for Filling:
In a large bowl, pour boiling water to cover:
4 cups of seedless organic raisins mixed with golden raisins
Add to the raisins, stir gently and let soak for 1 hour:
1 Tablespoon of pure vanilla extract, fine quality (you can substitute with sherry or brandy)
Photo clarification note: This looks like a one-cup measuring cup but it’s really a large 2-quart bowl marked like a standard measuring cup. 🙂

Drain the raisins in a sieve or strainer for about 1 hour.

Pat the raisins dry with a few paper towels to make sure they are not soggy.
Slice and chop into very small diced bits:
15 dried figs (we used 10 small dried Mission black figs, 5 large Calimyrna figs)
4 dried Medjool dates
Tip: This combination of figs and dates should make about 2 cups of a finely sliced and chopped mixture.

Chop the slices into dices and make them as small as you can by hand, even smaller than shown in this photo if possible…

Now to the nuts…You may use walnuts or pecans for this recipe if you like.
Spread evenly on a baking sheet pan and bake at 350 degrees for about 10 minutes until golden brown:
4 cups whole skin-on almonds (substitute walnuts or pecans)
Remove the roasted almonds, stir and bake an additional 10 minutes at reduced heat of 325 degrees using the broiler or top heat in the oven if possible. Watch carefully to be sure the almonds don’t get too brown. We’re looking for a perfectly golden color. 🙂

Now. SMELL the aroma wafting through your kitchen! Amazing, isn’t it?
When the almonds are cooled, chop them into a small diced chop using the food processor — or chop by hand.
Tip: Kick on my Pandora radio channel and listen to some classic rock if you’re chopping by hand and you’ll do fine. Just know, them’s a lot of nuts. Whew!

In a large bowl, combine the nuts with the prepared fruits…
Photo clarification note: This looks like a one-cup measuring cup but it’s really a large 2-quart bowl marked like a standard measuring cup. 🙂

You MUST use your fingers to start working all nuts and fruits together nicely into a well-combined bowl of figgie, date, raisin-y, nuts…

Your mixed fruits and nuts are now ready and the next stage —
The Boiled Icing is ready to prepare. Remember, from this bowl of nuts and fruits, feel free to take away as much as 2 cups of mixed fruit and nuts (to use for snacks or other purposes) if you think you will want a cake filling with less nut-fruit mixture.

Now on to the Boiled Icing for the crowning glory of the Lady Baltimore Cake…
2-step Boiled Icing for Filling and Frosting: a fabulous, dreamy frosting that is purest white. We will separate some of the frosting ingredients so that you don’t have to work so fast to frost the outer cake before the frosting does it’s cool science trick and hardens. The bulk of the frosting will be prepared first to mix with the fruits and nuts for filling the inner cake layers. The top of the cake can be spread with this filling also, but that’s optional. Then we’ll work on the outer frosting. It’s a fun 2-step process resulting in a cake frosting that will transform before your eyes to harden into a soft white crust over the outer cake.

Let’s take a way-quick look at a bit of the history of Boiled Icing…
This is a “soft ball” discussion from Iglehart’s 1920’s recipe booklet…

Don’t forget the 1897 “saltpoonful” from the “Up To Date Cook Book” by Thought and Work Club, Salem, Mass, 1897…

Tools Needed for Boiled Icing:
Large heavy pot
1 Medium bowls (for removed egg yolks)
Large bowl (for main whipped egg whites)
Medium bowl (for reserved second batch of frosting for the outer cake)
Electric mixer (stand mixer preferred but hand-held is do-able…I know, I’ve done it. 🙂 )
Large spouted pouring device (optional, to pour hot sugar water into egg whites)
Spatula
Ingredients for Boiled Icing:
3 cups of granulated sugar
3 cups of fresh water
12 large egg whites
Directions for Boiled Icing:
Place into a large heavy pot:
3 cups of granulated sugar
Pour over the sugar without stirring and bring to a medium boil on medium heat without stirring:
3 cups of fresh water
Boil the sugar-water mixture until the sugar “threads” or until the mixture reaches a heat point of 240 degrees (could take up to 30 minutes). This is where the strongly recommended thermometer comes in. Since this mixture will be used to cook the egg whites for the icing, this mixture must reach a high heat point of 240 degrees in order to properly cook the egg whites for safety reasons (and to make this icing work the way we want it to).

Separate 12 large eggs (egg yolks will not be used in this recipe).
Using an electric mixer, beat on high-speed until stiff:
the separated 12 large egg whites

Set aside some egg whites: Remove and set aside 3 cups of the whipped egg whites (to use for the plain frosting for the sides and top of the cake).

Set aside some sugar syrup: From the molten sugar-water pot, carefully pour into a holding container and set aside 1-1/2 cups of the very hot sugar syrup (to be re-heated for the plain frosting for the sides and top of the cake).
Now back to our filling: Slowly drizzle the balance of the hot sugar syrup into egg whites while the mixer is on low-speed.

Increase the mixer speed to high-speed and whip away until you have a finished glossy boiled frosting that looks just as loverly as this…

Okay. You’re doing great!
Now get your cakes at the ready for frosting activity like little soldiers all in a row. 🙂 And get your fruit-nut mix ready to rock too…

Decide if you want to use the entire bowl of mixed fruits and nuts for the cake filling. As discussed above, you may choose to remove as much as 2 cups of fruit-nut mix and the cake filling will still be nutty and fruity. Decide if you want to use fruits and nuts on the top of the cake or leave the top smooth.
Mix the prepared Boiled Icing in with the prepared fruit-nut mix.

Fold nuts and fruit thoroughly into frosting.

Spread the frosting on the cake layers…

The top of the cake can be left pristine or dolloped with the nutty frosting (or covered the plain mixed nuts mixture without frosting)…your choice. All will soon be swallowed in pure white icing.
I left the top of my cake plain…

Re-heat the reserved 1-1/2 cups of sugar-water syrup to 240 degrees and drizzle it slowly into the reserved 3 cups of egg whites, beating to a heavenly and glossy finish.
Using a spatula or other frosting tool, spread the prepared Boiled Icing over the top of the filled cake, adding extra Boiled Icing at the top sides to let it run over the edges, smoothing it down and across the sides of the cake and decorating the cake in your preferred fashion. You may create swirls or dots or make it completely smooth using a flat tool or spatula.

Here is a photo of the sides of the cake being frosted. It is a little sticky but it spreads like a dream…
Because this sticky Boiled Icing will harden soon, be sure to wipe away any drips while the frosting is still wet. I used a few wet paper towels to clean away my messy drips.
The Grand Lady Baltimore has now been freshly frosted with the historic Boiled Icing. Before it dries, you will see a glistening snow-white cake…

It may take a good hour before the cake is fully hardened. Store the cake in a large cake container without letting anything touch the frosting at any point before serving. Initially, the frosting could become “dented”. After it dries, the frosting could become “chipped”. Overall, this is a nice cake for traveling and I would say it travels well on a large sturdy cake plate, covered or uncovered.
Here’s to your vintage celebration cake!

Happy New Year’s to you all and be sure to join us on Facebook, on Twitter and now on Pinterest!
Leslie


Leslie with Mom at Mom’s book signing for While Wandering book

Viola Odell signing While Wandering books Photo by John Albritton

Christine Murphy, Photographer, speaking at book signing event for While Wandering book by Viola Geary Odell

Christine Murphy, Photographer, with Viola Geary Odell, Author of While Wandering
Related articles that may be of interest to you:
Marco Polo Profiterole Tower by Bake This Cake!
Wild Blackberry Charlotte by Bake This Cake!
Princess Kate Chocolate Mocha Cake by Bake This Cake!
 Back to the present…The grand lady of vintage cakes…drum roll pleeze for the Lady Baltimore Cake — an amazing celebration cake that tastes like the perfect 1920’s Regulation Butter Cake. You can eat this cake plain, no kidding, and you’d be happy with it. BUT it comes with a decadent filling that includes chopped nuts and exotic dried fruits. AND THEN…the whole dang thing is frosted over with a remarkable old-fashioned Boiled Icing (from turn-of-the-century recipes) that spreads like a dream then hardens to look like a bank of frozen snow. A frosting that you can gently crack into, literally! I’m thinking it’s going to knock your country socks off — or your urban city argyles, as the case may be.

Mystery Origins: Maybe you thought this cake was birthed in Baltimore, Maryland. Nay, tis said, even though some swear by a connection to King Charles I of England and his Lord  and Lady Baltimore. Others say this cake stems from a real antique called the Queens Cake (though the differences make that seem unlikely). This version of the proud lady starts with a vintage “plain white cake” aka “silver cake”, that is really a “butter cake” but using only egg whites :), and possible wife to the Lord Baltimore Cake (that is made with the leftover egg yolks and filled with chopped cherries, nuts and macarons). The most likely nationally published origin of the Lady Baltimore Cake was a romance novel entitled Lady Baltimore, written by Owen Wister in 1906 (with a story that literally revolves around this cake). Folks say that, prior to writing the book, Mister Wister had been given this Charleston cake by Alicia Rhett Mayberry and the cake so impressed the author of The Virginian that he included it in his novel in a big way. And so a Southern classic was born that may now be considered a bookish sort of literary cake. Ha!
Over the decades: Here’s a look at a snippet of the 1920’s version of this cake made in 2 layers in a brownie-sized pan, a later version in 2 round layers dotted with cherries…and our version….

We kicked-it-up in the elegance category a notch, making it a tad more fanciful with 4 large round layers, but keeping close to the original “receipt” (the old-fashioned word for “recipe”) in most other ways. We did not splash it with sherry or brandy, but that’s always an option. 🙂
Our Special Occasion — My mum’s book: Whoo hoo! The Lady Baltimore Cake is really something special and is destined for a special celebration. Could be a sophisticated vintage wedding cake or a cold weather cake, a birthday cake or the best  cake for New Year’s. But the special occasion for THIS particular cake — my 90-year-old mum’s first book signing event for her amazing new book (I’m partial, of course 🙂 ), “While Wandering: A Photo-Poetic Journey Through California Landscapes“. As a fan of naturalist, John Muir, and the Sierra Club all her life, my mom wrote a fascinating poem for each of her (other) daughter’s dramatic photographs of the California wilderness and country landscapes. Christine Murphy took the incredible photographs that accompany each poem
  of madré’s book. The photographs showcase incredible scenes of wanderings over the years throughout majestic California sites like: Yosemite, the short grass prairies of the Central Valley, the Big Sur coastline and the Monterey Bay area. Check out their Facebook While Wandering page with even more cool photos and poetry. (You go, Mom! We’re so very proud of you!) 🙂
Slow Cooking Warning: This is a cake project, in my opinion. It is a “gift of time” cake that will make your party howl when your friends and family first land sight of it. This cake is not hard to make but it takes some set-aside time for chopping nuts and dried fruits (although a food processor might fill that bill if you can get the chops small and evenly diced with the machine). The nuts should be oven roasted a tad just to bring out their highest flavors and the raisins need to soak a while. Oh, and you’ll also need some extra time for the interesting science experiment with the Boiled Icing (here’s where you’ll want to haul your dorm-mates, your kids or your best friends into the kitchen to watch — cause it’s cool). So be warned, this is not your grocery store cake-mix cake. It’s the real deal! 🙂
Another Warning – Oh My!: The only special tool you’ll need, besides a mixer, is a thermometer (a simple candy thermometer on up to something fancy — and they’re not  expensive nowadays, like $15+) to read the heat of the boiling sugar-water at 240-degrees (unless you want to try your eye at catching it at the right “threading” moment. Not!). Another good reason to use a thermometer: Since the egg whites are basically cooked with the molten drizzle of boiled sugar-water, it is safer in my estimation to use a thermometer for this purpose. So just lay out the cash, pick one up and call it a day. Be VERY careful with the molten liquid and don’t let your fingers stray near it for a second — and be sure to drizzle it slowly into the whipped egg whites lest it splash. Doesn’t this sound like a dangerous cake? Ha! You can do this — with a little caution and careful attention.
Enough of the warnings already! I say let’s get to it…so….Let the cake project commence! And I’m gonna show you each step along the way with a photograph. 🙂

BIG CAKE! The recipe given here is for a BIG CROWD CAKE…4 BIG layers — enough to feed a couple dozen party-goers or more at a fine celebration. To make a standard sized cake, just divide the quantities given by 4. For example, instead of the 4 cups of roasted almonds, use only 1 cup, etc.
This cake starts with lots of gorgeous dried fruits and nuts. We used almonds but walnuts and pecans are awesome in this cake too.

Like I said, this is pure vintage cake, listed here in a 1920’s recipe book by Iglehart…

Tools Needed for Lady Baltimore Cake:
2 large round cake pans (22″x2″)
Cooking spray
Wax paper
Very small bowl or cup (for a little lemon juice)
Electric mixer
3 Medium bowls (for softening butter and separating eggs)
3 Large bowls (for creamed butter-sugar, egg whites and flour mixture)
Spatula
Whisk
Measuring cups and spoons
Scissors (for trimming wax paper)
2 pancake flippers (or one large cake slider, or any large flat metal object like a wire cooling rack, a flat-sheet cookie pan)
Ingredients:
2 teaspoons of fresh lemon juice
4 cubes (2 cups) unsalted butter
4 cups granulated sugar
7 cups all-purpose flour
4 teaspoons baking powder
2 cups of low-fat (2%) milk
6 egg whites
1 Tablespoon vanilla extract, fine quality
Directions for Lady Baltimore Cake:
Prepare two large round cake pans that are 22″ round by 2″ high by spraying each with cooking spray and lining them with a large piece of wax paper (with enough wax paper to hang well over the edges. Spray the wax paper with another coat of cooking spray. (We’ll trim away the extra wax paper later after the pans are filled with batter.)

Prepare and set aside: 2 teaspoons of fresh lemon juice

Microwave for a few seconds to soften to room temp:
4 cubes (2 cups) unsalted butter

Stir the room temperature butter with a fork before use. 
Cream the butter by beating it on high-speed for a about 3 to 5 minutes until fluffy.

Add to the butter:
4 cups granulated sugar
Let the creamed butter and sugar mixture rest in the bowl for about 5 minutes to be sure all granulated sugar is dissolved then beat on high-speed for an additional 1 minute.

In a large bowl, whisk together:
7 cups all-purpose flour
4 teaspoons baking powder

Beat into the butter-sugar mixture on medium speed:
2 cups of low-fat (2%) milk

Fold the dry ingredients into the batter with a spatula, a few portions at a time (and take your time to be sure the dry ingredients are well incorporated).

Separate into 2 medium bowls 6 large eggs and beat on high-speed until fluffy about (3 minutes):
6 egg whites
Note: We won’t be using the egg yolks for this cake — but they’ll be good for morning eggs.

Fold into the batter:
1 Tablespoon vanilla extract, fine quality

Fold the egg whites into the batter:

This is a large recipe, so continue with your patient and gentle folding of the dry ingredients to incorporate the egg whites into the batter…

Fold into the batter, making sure the batter is nice and smooth:
the prepared fresh lemon juice .

Spread the thick dough in the pans, almost to the top of each pan then cut away the excess wax paper (leaving some overhang to easily lift the cakes from the pans).

Bake at 325 for 35 to 45 minutes until the toothpick test shows completely clean. I highly recommend using your cake thermometer for this purpose. The internal temperature of this cake should be 210 degrees.
Tip: These are large cakes so a toothpick test does not necessarily give you a proper reading and you want to be certain this cake is properly and thoroughly cooked in the top and lower center to achieve perfect results.
Hailing hot from the oven in the wax paper wrapping…

Remove the wax paper while the cakes are still warm and let them cool on racks thoroughly. Using a large, sharp serrated knife, trim the top mound of each cake to be level and then create layers by slicing each cake in half horizontally.
Tip: How to cut a large cake in half by hand: One way to cut a big cake in half is to place the cake on wax paper on the counter for easy rotation. Using a large and very sharp serrated knife, cut into the side of the cake a couple of inches deep at the half way point between the leveled top and bottom of the cake using little in-and-out strokes while rotating the cake with your other hand. Make only a shallow cut for the first rotation of the cake. After one complete rotation, continue cutting a little bit deeper into the cake while continuing to rotate the cake with your left hand. It may take 3 or 4 rotations until you hit the center of the cake with your knife to complete the slice.

For large cakes like this, it is best to use 2 large “pancake flippers” to remove the top layer onto a piece of foil or plastic wrap for storage.
Wrap the cake slices in aluminum foil to keep them fresh while you prepare the filling and frosting.

Next up in this 3-part series…the amazing nutty and fruity Lady Baltimore Filling…
…and the more amazing Boiling Icing that is poured over the cake to dry to a smooth finish…

Let the festivities commence!
Happy new year to you all and thank you ever so much for joining us in the celebration of old-fashioned vintage cake baking. I’m so glad to meet you all and receive your comments.

If you haven’t already, be sure to join us on Facebook, follow us on Twitter or share our pins on Pinterest. 🙂
Leslie


Christine Murphy discusses her photographs at book signing event.

My niece, Carmel Helene, singing at my mom's book signing event.


Working with a way-old American recipe, this country cookie dough is wrapped around fresh figgie or strawberry filling for 4-way variation on a very vintage theme. THEN we drizzle on the Sherry Icing. Holy cow! We’re reconnecting with Vintage Prairie Cakes! Bring ’em on! Continue reading

Looking for the best classic old-fashioned cream frosting for your holiday cake? We’ve got you covered in vintage cake style. And how about a holiday cake filling made with cranberries, strawberries and buttercream, oh yeah! Pure white cake and frosting elegance with a sweet double berry filling — that’s what special old-fashioned holiday celebrations are all about. Continue reading

Our Vintage Whipped Cream Cake recipe is a simple and delicate holiday cake filled with a sweet filling of pureed cranberries, strawberries and buttercream (that we call Berry-Berry Filling). It’s frosted in classic style with an old-fashioned silky Cream Cheese Buttercream Frosting. What could be more charming for your holiday festivities than a simple and elegant homemade classic? Continue reading

Homemade sweet and simple holiday molded whole cranberry sauce recipe without gelatin or pectin. Use a bit of it for the Berry Berry Filling mixed with strawberries and our buttercream frosting for our Vintage Whipped Cream Cake. Continue reading